Sunday, 29 May 2011

A busy week!

This week has been a whirlwind of activity! First the Chelsea Flower Show on Wednesday, then I made these baby shoes for an order on Thursday.  They are a really sweet design, but quite fiddly to make with all the bias tape sewn onto the edges.
 Little P was very busy too, icing cakes for our sewing course on Thursday evening.....
 and making Mr B and I salad for our tea!
 Today I had great fun creating a pair of cropped trousers for the little lady in less than an hour.  It was very satisfying sewing indeed, all we need now is some lovely sunny, warm days so she can wear them!
What have you been up to this weekend?  Have a good one!

Friday, 27 May 2011

Chelsea Flower Show

 
A fantastic day was had by three generations of girlies in my family when we visited the Chelsea Flower Show this Wednesday.  I had been waiting five years to visit as no children under 5 years old are allowed to attend, so I had to wait or little P to be old enough before we could go.  This year the time came!! My mum, me and little P all travelled up to London and spent a whistful four hours marvelling at the show gardens and browsing the great trade stands.

The grand pavillion was bursting with fantastic displays from Nurseries all over the country.  This display of carnations particularly caught my eye.  The flowers were all arranged like giant pom- poms, beautiful!

We visited all the show gardens, and spotted a few celebrity gardeners, but I have to say my favourite show garden was this one (below).  I would never consider tufing my lawn with bright blue artificial grass, but in this design, and with the silvery planting scheme, it looks absolutely beautiful!

Thursday, 19 May 2011

Sewing book review and mummy and daughter cooking!

As promised on my last post here is a picture of the latest edition to my craft book collection. Girl's World has 21 fabulous sewing projects for the little girl in your life. It's not all clothes, there are homewares and accessories, but I have to say the book is definitely worth buying for the full sized dress patterns included.
Jennifer Paganelli the author and creator is probably better known for her fabric line, Sis Boom fabrics, printed and distributed by Freespirit. However, the patterns seem very simple to follow and the styles compliment the bright fabrics beautifully.


I'll be attempting this design first, probably in a pink or lilac fabric colourway:-
Then this sash dress (below) would be perfect to make for a little party dress!

Girl's World is definitely going to be thoroughly used and enjoyed this summer. If you would like to get hold of a copy you can order through amazon here:-
http://www.amazon.co.uk/Girls-World-Twenty-Pretty-Projects/dp/0811874443/ref=sr_1_1?s=books&ie=UTF8&qid=1305826529&sr=1-1

And now onto cooking........

Last night, after explaining to Little P how I couldn't resist buying a pot of Cornish clotted cream at the supermarket, we decided that after school today we would make scones together. It was brilliant fun as you can see from the photos, and Little P has become very profficient in rubbing the butter into the flour. I think this has something to do with the hundreds of times mr B and little P have made rock cakes together!

Here she is rubbing in...........

And rolling out the scone mixture. We decided to use the new cookie cutters that Grandma bought so we would have more interesting scone shapes rather than just round ones.
Very concentrated work brushing the tops of the scones with milk......

Mmmm...... I can confirm the resulting scones were delicious!

Sunday, 15 May 2011

Productive afternoon at the allotment

 We had a really super afternoon at the allotment today.  I'm still waiting for several seedings to be large enough to transplant from my greenhouse to the plot, so we didnt have any to take down to plant today which was a shame, however there was still plenty to do!

We had a bit of a weed and tidy session and then planted some seeds in the front right cutting patch.  Today we put in Giant single sunflowers, hedging sunflowers, cornflowers and a row of mixed salad leaves towards the front.  I'm hoping these seeds germinate as I didnt have much success with the sunflower seeds I put in the left hand cutting patch.
 Mr B attached our plot sign to the front raised bed- I think you can just make it out in this photograph (above) on the right of the picture.

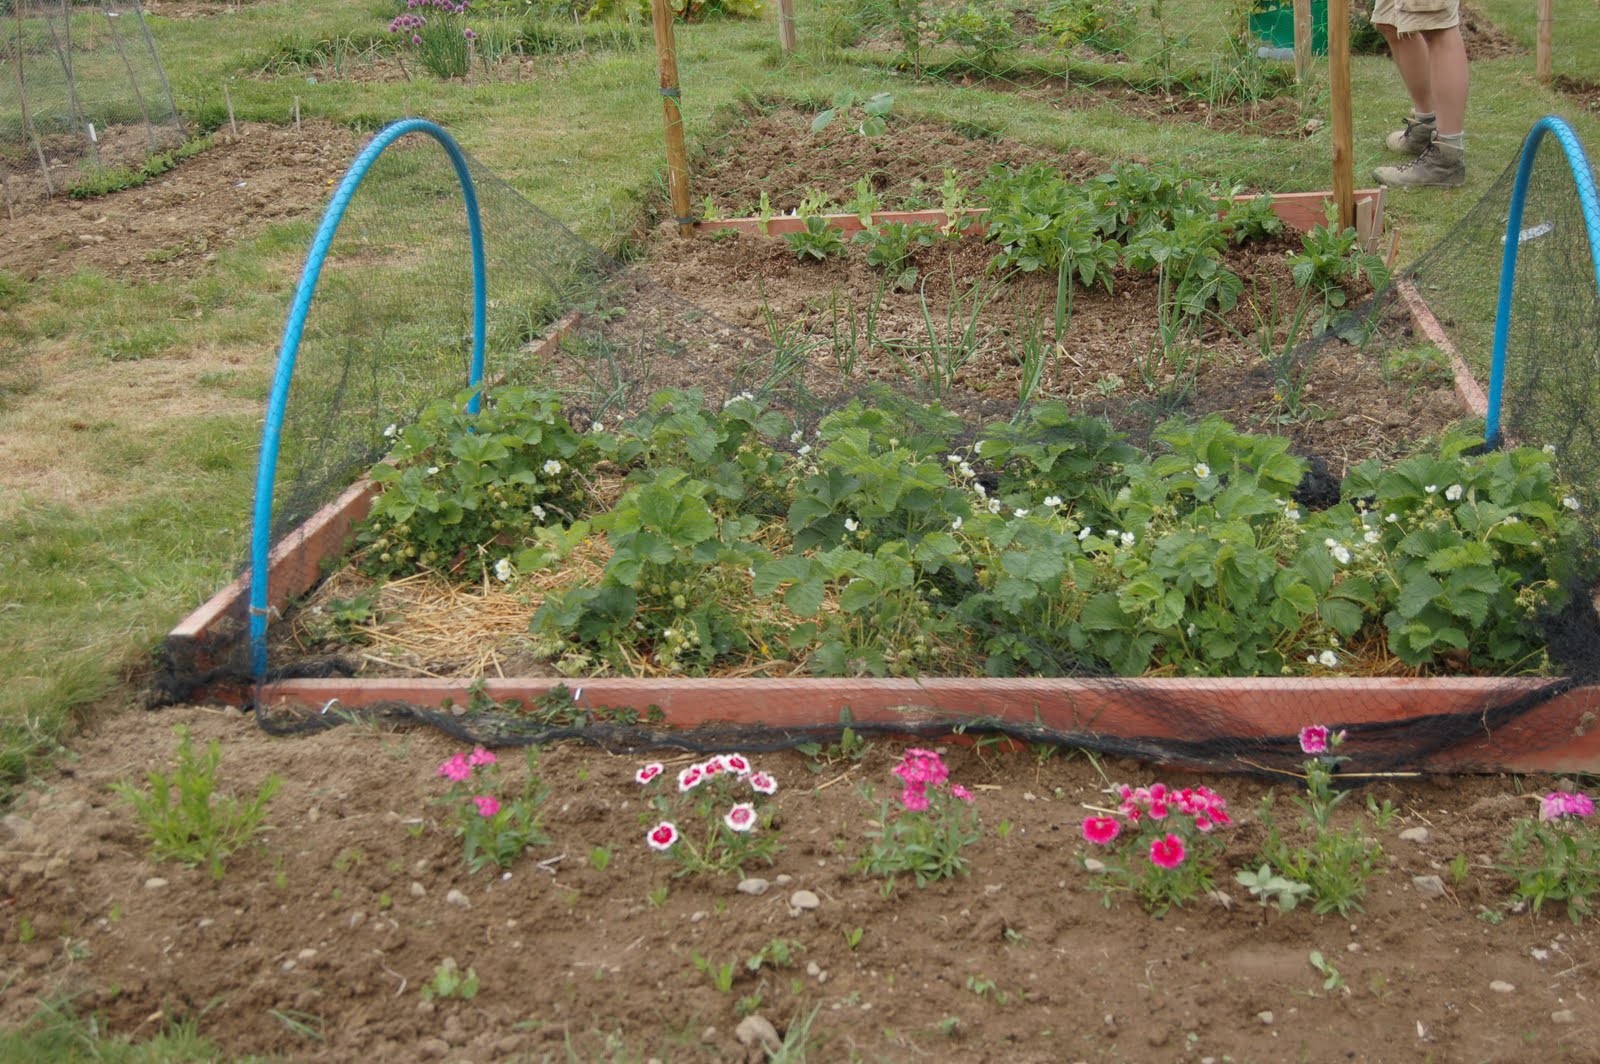
We then netted our strawberries (below), and I was pleased to discover that in the cutting patch just to the front of the strawberries there are quite a few self seeded nasturtiums, cosmos and calendula coming up!  I'll need to remember to keep these watered now and to take care when weeding this bed!
 Little P had a great afternoon and made a new friend.  She was happily playing for about three hours which was great, normally we struggle to keep her enthusiastic about staying at the plot for more than about an hour!
 And here is little P's allotment patch.  You can see towards the left of the bed, her two little rows of radish have germinated.  She also has strawberries and raspberries growing happily in her patch, and today we put in more radish, mixed salad and carrot seeds.
 This bed was given a bit of TLC today and was weeded and watered and then popped in a pumpkin plant, waiting to be joined in about a weeks time by others from the greenhouse.
Hope your weekend was as productive as ours- check back tomorrow for a sneek preview to a great new sewing book I aquired this weekend!

Wednesday, 11 May 2011

Wednesday's Sewing snippets

Sometimes I just get the need to create, and there's nothing better than sitting with a pile of fabric offcuts trying to decide what to make with them.  These small pieces of fabric are crying out to be made into something neat and useful.  Today I felt the need to create- not a major item, just to sit and design and make a useful item quickly and simply, to experience the satisfaction of seeing a project through to it's end in a short space of time.
I decided to make a sunglasses case for little P's new Peppa Pig sunglasses.
It was a joy to create and only took half an hour to run up from start to finish! There are adaptations I would make if I were to make a few more, but that's the fun part of the design and make process, always searching for niftier ways of doing things. I am going to make a few more, one for me and a special manly one for Mr B (maybe with some camper van fabric?) and I'll post a tutorial up showing how to make them as soon as I can.

Moving on to other projects- I took a peek in little P's summer wardrobe and was a bit dismayed to find that many of her dresses from last year are now too short! So my ongoing spring project is to run up a few summer dresses for the little lady.  Here are some of the ideas we have so far:-

Do you have any favourite children's sewing patterns? Feel free to leave your comment in the comments box below:-
Have fun, and happy Wednesday!

Monday, 9 May 2011

Update on the veg plots and allotment

In the news today there has been lots of talk of the UK having a bumper strawberry harvest and an earlier season due to the warm dry spring we're experiencing.  On a personal level I can certainly vouch that our two strawberry patches are looking very healthy and we have some very early strawberries all ready to ripen in the sun.
Our allotment has been a little neglected of late, due to the same reasons why I havent updated my blog, but this afternoon I pottered down, weeded around the strawberry plants and spread straw on the ground to prevent rotting and to try to discourage slugs.
When I mentioned to Little P what I'd been up to after school, she suggested that we sorted out her strawberry patch too.  So not to be outdone she spread straw all over the gaps between her little plants.  I'm hoping the sweetcorn seedlings growing in amongst the strawberries aren't harmed by the straw!

Here's a little look at the home veg plots which I am sorry to say are looking in better condition than the allotment at the mo.  Oh well, it's still major planting time so hopefully if we get a real push on planting at our site we should be fine for crops this year, fingers crossed!

Here's a general view of our home veggie patch:-
And a close up view of one of the beds- I'm still waiting for the runner beans to germinate at the back of the patch, I planted them over a week ago now.

And finally for today- my first cut flowers of the season from the garden, they really cheer up our outside dining area!

Check back tomorrow for some more sewing snippets!

Sunday, 8 May 2011

Up and running again!

After a very long break at blogging I'm back! Bursting with projects and ideas and seasonal veg planting tips.....
But first, a great deal of sewing has been taking place in my little part of the world and over the next few posts I'll be sharing some of my latest makes with you.  Today's offering is a skirt I made this afternoon, sitting with my sewing machine on our garden table and basking in the warm sun as I toilled!
Little P, who has grown quite considerably since my last post, is the proud owner of a brand new summer skirt.  The pattern was quite simple and adapted from a tutorial on the brilliant Tanya Wheelan's blog- here's the link:-
http://grandrevivaldesign.typepad.com/photos/ruffled_skirts_tutorial/index.html

The overall design did take quite a bit of fabric, I'd say about 3/4 of a metre, so if I make another one I'll make it slightly less ruffles and defnitely make the second ruffle layer longer. Very pleased with the result though especially as it was only just over an hour's sewing- not bad eh!

Tuesday, 2 November 2010

Monday, 25 October 2010

Little P gets a Daddy day........and I get excited about a new hobby!

 Yesterday Mr B was very excited as he had a 'Daddy and Daughter' day! I was off on a course for the day and so little P and her dad had an blissful sunny Autumn day to spend doing whatever they wished.  And just what do a daddy and daughter do when Mum's away...........make boats of course!!
 Here is little P proudly displaying the boat she made and then sailed in a local pond.

And what was I up to then?........
I had been invited by a very good friend of mine to attend a one day scrapbooking course.  Now I have a long history of making cards, but I've never tried scrapbooking before- but I have been intending to make a scrapbook of little P's first year ever since she was born.  This course was to be the catalyst that would hopefully inspire me to make the album- and inspire me it did!! It was brilliant! I was really pleased with all the pages we made on the day and I've come home full of new skills and techniques that I'm itching to apply to lots more scrapbook pages!

Here is Page 1- Little P just after she was born.
Page 2- A one month old little P

Page 3- A two month old poppet
And finally- (unfinished page) Little P at three months!
It seems I really am hooked on a new hobby! Can't wait to research and make more layout styles, and you never know I may just get Little P's first year scrapbook album made before she is six!

Thursday, 30 September 2010

Pumpkins a Plenty!

The squash plants at the allotment are all dying off now.  I cant decide whether the colder weather has caused them to become wizened and the leaves to shrivel and die, or whether I just planted the seeds a little too early to be able to keep the plants growing healthy and strong all the way to Halloween.  This has been my first year of trying squash with any sort of conviction (I previously grew one small pumpkin a couple of years ago in our garden vegetable beds) so this year was to be the year that I gave over a whole bed on the allotment to pumpkins and squash.

There have been some successes and some disappointments.  The butternut squash didnt perform particularly well, but as you can see from the photograph below we did manage to grow two small fruits.
I'm storint the larger pumpkins in the greenhouse for now to hopefully harden the skin and complete the ripening process before storing in the house ready for carving at the end of the month!

The allotment is certainly needing a little Autumn TLC but we're still picking decnt crops of Runner beans and French beans- plus we've got loads of red salad bowl lettuce and lollo Rosso and a handful of bulbs of fennel.  The Brussels sprouts are also growing nicely- I'm hoping there'll still be some maturing later in the season for our Christmas Meal!

Thursday, 2 September 2010

Garden vegetable patch haul!

Two posts in one day...........have I taken leave of my senses!! No, but I just couldnt resist as I have just unearthed a couple of lovely surprises in the garden.......
With all the rainy cold days of this August, family holidays, and with our allotment to look after, I'm ashamed to say that our garden vegetable patch has become just a little bit neglected of late.  This afternoon as the sun was shining I decided to clear away some of the plants that had gone to seed or had become old and straggly.  As I started the task of tidying up just one of the beds I discovered carrots, Kohl Rabi and flat leaved parsley all waiting to be harvested.  Then I picked the cherry tomatoes that are ripeneing beautifully on some plants that I just popped in the patch as an experiment and added those to today's tomatoes from the greenhouse, and of course this week's cucumber!  Altogether it looks like quite a haul, especially considering the fact that I thought I would just be clearing one of the patches, I never would have thought there was produce to be harvested too!
I have been particularly pleased with some of the tomato varieties I planted this year as they have been good heavy croppers.  In the greenhouse a plum variety called 'Shirley' has done really well, as has old cherry favourite 'sungold', however in the garden veg patch I planted a cherry variety called red cherry which has produced prolific fruits of pink/red colour in long trusses.  I think this variety is probably more suited to a container, where the fruits can trail over the sides, but I was nevertheless impressed with it's performance in the soil.  I wonder what delights vegetable bed number 2 will reveal when I tackle clearing it tomorrow?

New Fabric Purchases

On a slight detour from mine and little p's opticians appointments this morning we ventured into a small department store in Farnham.  It doesn't have a very extensive fabric collection and it is mostly geared for the quilting market, but I did catch sight of these two lovely fabrics from Clothworks.  They immediately conjured up an idea for a simple autumnal a line pinafore for Little P complete with contrasting fabric ruffle at the hem.  So I bought a metre of each on the spot! 
I also stocked up on some small haberdashery items as I am keep to make some little fabric bags to store Polly Pocket paraphernalia in. Little P received her first set of Polly Pocket for her recent birthday and the pieces are very small so I'm worried about losing them unless we can devise a suitable storage option!

Wednesday, 1 September 2010

Reversible Tote Bag Tutorial

This is my first tutorial so please excuse any formatting issues etc.

You will need:-

2 x pieces of fabric 36cm x 27 cm (outer)

2 x pieces of fabric 36cm x27cm (lining)

2 pieces of fabric 5cm x 60cm (outer)

2 pieces of fabric 5cm x 60cm (lining)

Step 1- make handles

With right sides together pin one lining handle piece of fabric to one outer handle piece. Using a 0.5cm seam allowance sew handle together along long edges. Turn so that right sides are outermost and press. If desired or if time allows top stitch 0.5mm from long edges.

Repeat for 2nd handle.


Step 2- Sew main body of bag

Using outer fabric and with right sides facing, pin and sew around 3 sides (2 short and one long side) leaving top side open. Still keeping right sides together place your hands inside the bag and push out the bottom corners to create a triangular shape at each corner.

Pin, perpendicular to the bottom seam 2.5cm from the corner to keep the triangle shape in place.


Then sew a seam along this line perpendicular to the corner (see photograph)

Cut excess fabric off

Leaving a 0.5cm seam allowance.
Repeat from beginning of step 2 for lining fabric.


Step 3- attaching the handles to bag

Take the outer bag piece and turn right side out. Take one handle piece and face the outer fabric of handle onto the outer fabric of bag (so reverse side of handle is uppermost). Lay the handle so that the loop is resting at the bottom of the bag and pit the two open ends to the top of the bag about 11cm apart. Using your machine attach handles to bag using a 1cm seam allowance. Turn bag over and repeat to attach handle to the opposite side of the bag, making sure the two places where you attach the tops of the handles match up on either side.


Step 4- making up the bag

Well done, you’re almost there! Keeping the bag outer just as you’ve had it for attaching the handles, take the lining section and with the right side of the lining facing the right side of the outer fabric, pop the outer fabric bag into the lining fabric bag. Line up side seams and pin the open section at the top of the bag together. (making sure the bag handles are safely tucked inside)

Sew around the top of the bag leaving a gap between the handles on one side of the bag open for turning.
Turn bag out like so:-


Next, pop the lining bag inside the outer to create your (almost) finished bag!
Pin and stitch the opening where you turned the bag 0.5 cm from the top.

Then continue to stitch 0.5cm from the top all around the bag to give it a neat top stitch.
Congratulations you now have a new, finished reversible bag!

This technique can be used to create a variety of different sized bags. You can embellish it with appliqué or pockets and if you don’t want to make it reversible you could easily secure the top of the bag with a strip of sew on Velcro or attach a button and loop closure. The possibilities are endless!